The IP Blocker in cPanel is a security feature that allows website owners to block access to their website or server from specific IP addresses or ranges of IP addresses. It’s a tool provided within the cPanel control panel interface, which is commonly used for managing web hosting accounts.
The IP Blocker feature helps website owners enhance security by preventing access from known malicious IP addresses, stopping unwanted traffic, or blocking specific individuals or organizations from accessing their website or server.
Website owners can manually input individual IP addresses or ranges of IP addresses to block, or they can automatically block IPs based on certain criteria, such as the number of failed login attempts or other suspicious activity.
Overall, the IP Blocker in cPanel provides website owners with a means to control and restrict access to their web server, helping to protect against various security threats and unauthorized access attempts.
IP Blocker feature
The IP Blocker feature in cPanel serves several purposes for website owners and server administrators:
Security Enhancement: One of the primary uses of the IP Blocker is to enhance the security of a website or server. By blocking access from specific IP addresses or ranges, website owners can prevent malicious users or hackers from accessing their server, reducing the risk of unauthorized access, data breaches, or cyber attacks.
Blocking Malicious IPs: Website owners can use the IP Blocker to block IP addresses associated with known malicious activities, such as hacking attempts, spamming, or other forms of cybercrime. This helps to protect the website and its users from potential harm or disruption.
Preventing Brute Force Attacks: Brute force attacks involve repeatedly trying different username and password combinations to gain unauthorized access to a website or server. The IP Blocker can be used to block IP addresses that have made multiple failed login attempts within a short period, effectively thwarting brute force attacks.
Blocking Unwanted Traffic: Website owners may want to block access from certain IP addresses or regions that generate unwanted traffic, such as bots, scrapers, or other automated tools. By blocking these IPs, they can conserve server resources, reduce bandwidth usage, and improve overall website performance.
Content Restriction: In some cases, website owners may use the IP Blocker to restrict access to specific content or sections of their website based on the visitor’s IP address. This could be useful for limiting access to sensitive information, premium content, or resources intended for specific users or groups.
Overall, the IP Blocker in cPanel is a valuable tool for managing and controlling access to a website or server, helping to enhance security, mitigate risks, and improve the overall user experience.
How to use IP blocker
To use the IP Blocker feature in cPanel, follow these steps:
Login to cPanel: Access your cPanel account using your username and password.
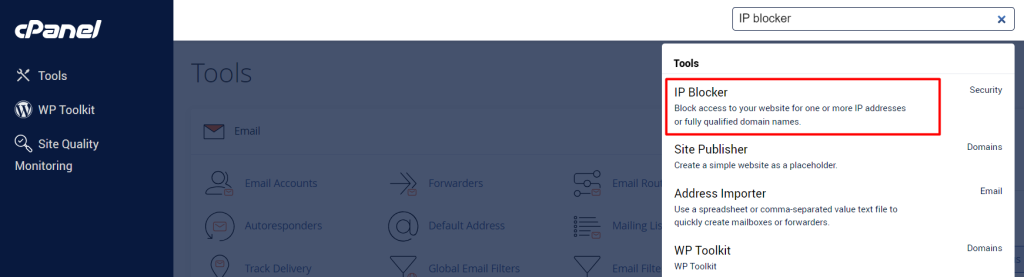
Navigate to IP Blocker: Once logged in, find the “Security” section. The location might vary depending on the cPanel theme, but typically, you’ll find it under the “Security” or “Advanced” section. Look for an icon or link labeled “IP Blocker” or “IP Deny Manager” and click on it.
Enter IP Address or Range: In the IP Blocker interface, you’ll see a field where you can enter the IP address or range you want to block. You can enter individual IP addresses (e.g., 192.168.1.1) or use CIDR notation for a range of IPs (e.g., 192.168.1.0/24 to block all IPs from 192.168.1.0 to 192.168.1.255).
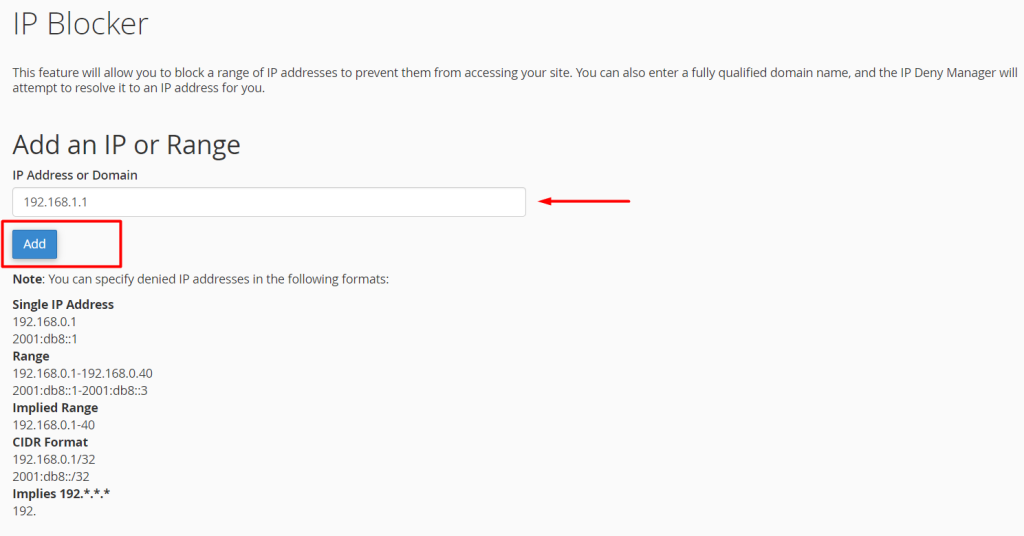
Block IP: After entering the IP address or range, click on the “Add” or “Block” button to add it to the list of blocked IP addresses.
Confirmation: Once added, you should see a confirmation message indicating that the IP address or range has been successfully added to the block list.
Test: You can test the IP blocking by attempting to access your website or service from the blocked IP address. You should see a message indicating that access is denied.
Manage Blocked IPs: To manage the list of blocked IPs, you can go back to the IP Blocker interface in cPanel. From there, you can view the list of currently blocked IP addresses, remove individual entries, or clear the entire list if needed.

It’s important to use the IP Blocker feature judiciously and only block IPs that you’re confident are engaging in malicious activities or unwanted access attempts. Blocking legitimate IPs can inadvertently prevent legitimate users from accessing your website or service.